

How To Install Windows Xp On Windows 7 Ultimate
Installing Windows XP\7\8\10 using WinNTSetup
If you wish, yous can utilise WinNTSetup to install Windows directly from a Windows Install ISO file. For instance, y'all can MBR-boot from a Windows x 32-chip ISO and then employ WinNTSetup to installWindows 7 x64 from an ISO, onto a GPT partition and install Win7 x64 in UEFI mode.
Install Windows seven onto modern systems
This procedure allows y'all to install Windows 7 onto a system that but has USB iii ports/controllers considering we boot to Windows x PE outset which includes USB 3 drivers and so Setup can admission the USB 3 ports.
New! E2B eBooks are now bachelor (including a complete course on making a multiboot USB drive and an eBook on Installing Windows). This method is very flexible, only does require some degree of 'expert' knowledge.
Advantages
- There is no need to UEFI-boot from the E2B USB drive
- Works from both Removable and Fixed-disk E2B drives
- Allows you to install XP or Win7 from a USB three.0 port and to a SATA\RAID drive (encounter below)
- Supports MBR and GPT installs
- No modification of ISOs or boot.wim required
- No .imgPTN file required
- No WinHelper USB Flash drive required
- You lot tin can utilise SDI_CHOCO or other XML files (XML files can be generated on WAFG website)
- Can cull any partitioning scheme without needing to modify the XML file
- Tin can be fully automated
- Tin can load different configuration files
Disadvantages
- Y'all volition need to wipe and partition and format the target deejay (e.yard. can easily apply a diskpart script from within WinNTSetup)
- Potential to wipe the incorrect disk!
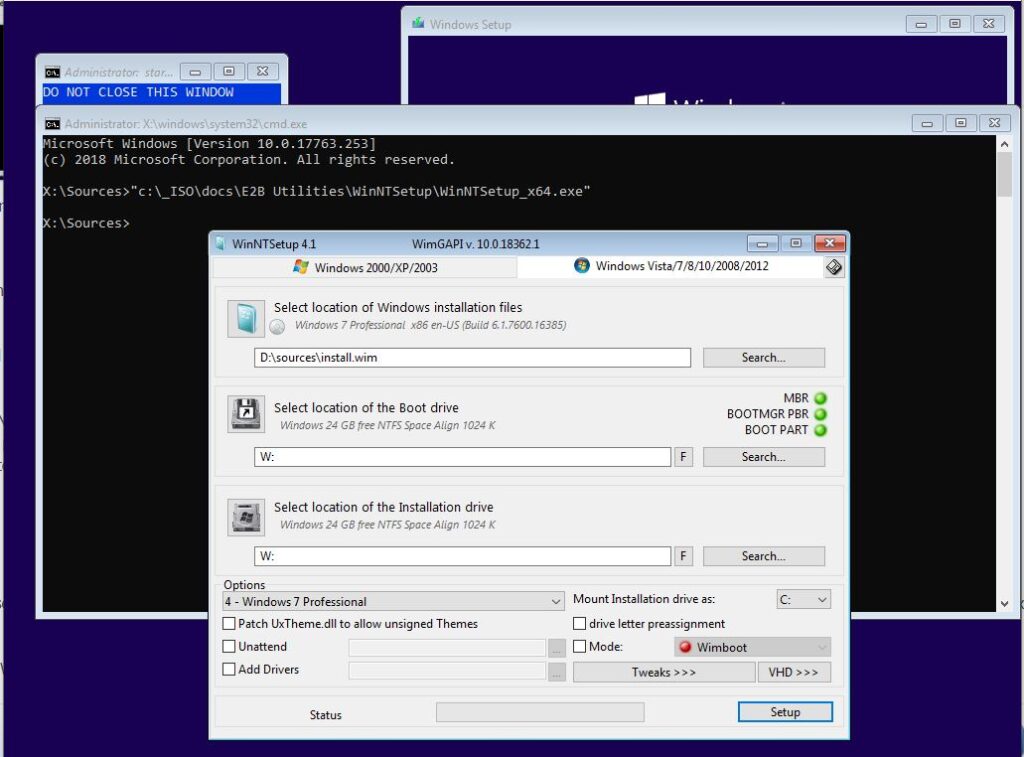
- WinNTSetup is used (see screenshot below)…

Tip: All three 'traffic lights' should exist dark-green. The Boot Function in ruby-red means that the partition is not marked active (bootable) and it should be!
Instance – Windows vii install on modernistic USB 3 systems
You can install Windows 7 (or whatsoever Bone) onto modernistic systems using this technique.
Method 1 (for 64-scrap CPU systems with cyberspace access)
i. Download Hirens HBCD PE ISO x64
2. Copy the ISO file to \_ISO\WINPE folder and rename extension to .isomap64
3. Copy your Win7 ISO to anywhere on the E2B bulldoze – e.g. \_ISO\WINDOWS\WIN7
four. Kick to HBCD PE ISO (MBR or UEFI)
5. Utilities – Difficult Disk Tools – Segmentation Tools –AOMEI Partition Assistant(partitioning target disk)
six. Utilities – Organisation Tools – Windows Setup –WinNSetup.exe (install Win7 – see beneath)
Method 2 (using Win10 ISO)
1. You will need to copy a Windows x ISO fileandthe Windows seven install ISO on the E2B USB drive.
e.g.
\_ISO\WINDOWS\WIN10\Windows 10 x64.iso (we volition but boot to this ISO)
\_ISO\WINDOWS\WIN7\Windows seven x64.iso (we volition install this ISO)
2. Download WinNTSetup as described below.
3. Boot to the Windows ten ISO (you can MBR\Legacy boot or UEFI boot using agFM)
4. Press SHIFT+F10 to open a command console and run WinNTSetup_x64.exe (or WinNTSetup_x86.exe if yous booted from a 32-bit Windows 10 ISO).

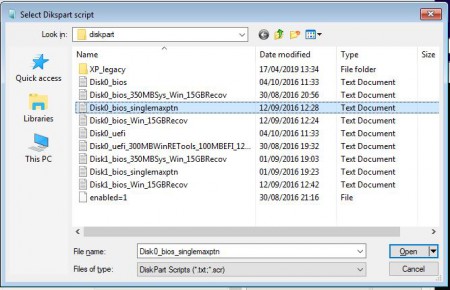
5. In WinNTSetup – pressSHIFT+CTRL+D – select the desired partition script for the right disk (usually deejay 0)
Tip: if you prefer, you can run MiniTool Portable Sectionalization Magic (partitionwizard.exe – registered versions only) to partition the target bulldoze (re-create the binder to the USB bulldoze first).
vi. Select the Windows vii ISO file and specify the Boot and System partitions (eastward.g. both = W:)
Tip: Right-click on the 'Select location' icon at the left of the screen in the commencement field to mount the source ISO file.
Check y'all have iii green traffic lights…
7. Select the Edition you want to install and click onSetup, then continue with the install.
eight. Remove the USB drive and permit the system to reboot from the hard deejay to complete the Windows vii installation.
Preparation
1. Download WinNTSetup v3.9.3 or a subsequently version (do not utilise an earlier version) andexcerpt all the files to the folder on the E2B USB drive at \_ISO\docs\E2B Utilities\WinNTSetup. This folder already exists on the E2B bulldoze and contains boosted useful files.
Tip: UseRight-click – Properties – UnBlock to remove the Windows security warning that you lot get when WinNTSetup is first run.
2. (optional) Download BootIce (x86 and x64 versions) for utilise equally a partitioning tool and re-create them both to the WinNTSetup folder.
3. We demand to first download some boosted files. Run WinNTSetup.exe under Windows from the E2B bulldoze. Say 'Yes' to permit it to download some needed files.
Now Quit WinNTSetup.
4. Make sure your E2B drive contains the ISO that yous want to install (can be anywhere on the E2B USB disk) – e.g. Windows_10_x64_Home_Pro.iso or Windows vii x64.iso.
Notation: Yous can utilise e.m. Win10x64x86October_.WinNTSetup.iso to automatically run WinNTSetup when WinPE loads.
five. (optional) Add a diskpart script .txt file (some are already nowadays in E2B). Make a text file containing the diskpart commands which you tin use to wipe and partitioning the target hard deejay. Run into here for some GPT examples and here for some MBR examples. Hither is one I used to partition Disk 0 as a GPT disk fix for a UEFI install…
\_ISO\docs\E2B Utilities\WinNTSetup\tools\diskpart\DiskPartGPT.scr
select disk 0 clean convert gpt create partition primary size=300 format quick fs=ntfs label="Windows RE tools" assign letter of the alphabet="T" create partition efi size=100 rem == Note: for Advanced Format Generation I drives, alter to size=260. format quick fs=fat32 label="Organisation" assign alphabetic character="S" create partition msr size=128 create division master format quick fs=ntfs label="Windows" assign alphabetic character="Due west" go out
If you have WinNTSetup v3.9.three or later, the \WinNTSetup\tools\diskpart folder will already incorporate some sample diskpart scripts.
E2B also contains some additional sample diskpart script files..
- Disk0_bios_350MBSys_Win_15GBRecov.txt
- Disk0_bios_singlemaxptn.txt
- Disk0_bios_Win_15GBRecov.txt
- Disk0_uefi_300MBWinRETools_100MBEFI_128MBMSR_Win_15GBRecov.txt (GPT)
- Disk1_bios_350MBSys_Win_15GBRecov.txt
- Disk1_bios_singlemaxptn.txt
- Disk1_bios_Win_15GBRecov.txt
Note that theDisk1_xxxx files volition erase the2nd disk (every bit seen past Windows) in your system. If you only have one deejay in the arrangement, the Disk1_xxxx files will erase the E2B USB bulldoze! I use the Disk1_xxxx files when booting from an E2B USB drive under VirtualBox+VMUB. Nether VBox+VMUB, Disk 0 is the USB bulldoze and Disk 1 is the Virtual Machine Difficult disk, so I must utilise the Disk1_xxxx files under Virtual Box.
Note: WinNTSetup v3.ix.3 and subsequently
If the file .\Tools\Diskpart\enabled=1exists, this will enable theCTRL+SHIFT+Ddiskpart feature in WinNTSetup.exe when it is run.
Tip: To make it easier to observe WinNTSetup afterwards, re-create the whole \_ISO\docs\E2B Utilities\WinNTSetup binder to \WinNTSetup.
Tip2: Simply rename the Windows ten ISO with a_.WinNTSetup.isofilename, due east.g.
i. Name the ISO file \_ISO\MAINMENU\Windows_10_x64_.WinNTSetup.iso
ii. Now boot to E2B and select the carte entry.
This will automatically load the ISO into WinNTSetup for yous. You lot tin select a different ISO (e.g. a Win7 ISO) if you wish.
3.At present go to Footstep 3 below (simply skip Stride 4)…
Run across blog mail for more details.
Kicking to WinPE and run WinNTSetup
one. Boot to the E2B Chief menu and select and MBR-boot from a Windows ISO (encounter below for UEFI-booting).
This can be the same ISO that you are going to install from or a different one (I propose using the latest Win10 ISO because information technology is likely to comprise the latest drivers). You can use any of the ISOs in the \_ISO\WINDOWS\thirty folders or just re-create a Windows Install ISO to whatsoever i of the other 'standard' menu folders (due east.g. \_ISO\MAINMENU). You tin can boot to almost any WinPE 8 or ten ISO (e.g. ChrisR's WinPESE ISOs, DLC ISOs, Gandalf ISOs, etc.). It tin exist a 32-bit or 64-bit ISO. Exercise NOT boot from a Windows seven ISO because information technology won't have modern chipset or USB iii support!
2. When yous reach the outset Windows 'Setup' screen, pressSHIFT+F10to get to the command crush.
If SHIFT+F10 does not work, go on to the adjacent Setup screen and try it once more.
All versions of E2B…
3. Create Partitions
At the Windows command crush, we need to wipe and partition the target hard disk drive.
Tip: Run WinNTSetup.exe and then press Use CTRL+SHIFT+D (see in a higher place) to automatically run a pre-real diskpart script to wipe and sectionalisation the drive – make sure you select the correct i or it may wipe a dissimilar bulldoze or your E2B drive!. You tin can then skip footstep 3.
Note: Under WinPE, Ctrl-Shift+D may not piece of work unless you use v3.9.1 or later.
Yous tin run aWindows DiskPart script. e.chiliad. where D: is the E2B USB drive…
diskpart /s d:\WinNTSetup\tools\diskpart\DiskPartGPT.scr
Or, if you prefer, you lot can create the partitions using diskpart past typing in the commands manually and use abbreviated commands (mostly three-letter abbreviations can be used) – .east.g. typecreinstead ofcreate:
diskpart
sel dis 0
detail dis
clean
convert gpt
cre par pri size=300
for quick fs=ntfs characterization="Windows RE tools"
assign letter T
cre par efi size=100
for quick fs=fat32 label="Arrangement"
assign alphabetic character S
cre par msr size=128
cre par pri
for quick fs=ntfs label="Windows"
assign letter West
exit
Note: Afterward versions of WinNTSetup (3.9.0+) allow you topress CTRL+SHIFT+D and pick a diskpart script file.
The file.\Tools\Diskpart\enabled=1 must be present for CTRL+SHIFT+D to piece of work. This file is already present in E2B.
Tips:
You can use the 'F' buttons in WinNTSetup to format any existing volumes. Make sure that you format the Arrangement EFI partition every bit FAT32.Press F1 in WinNTSetup for assist.
Example manual diskpart commands for single maximum size sectionalization:
diskpart
sel dis 0
make clean
convert mbr
cre par pri
for quick fs=ntfs label="Windows"
assign letter C
active
leave
Note that a 'convert mbr' or 'convert gpt' command is required to ensure that Windows does non fail during installation of kicking files, due to any previously-used sectionalisation scheme.
If you adopt, you could run a unlike segmentation tool to prepare the target hard disk beginning, instead of using diskpart (e.g. boot from a EaseUS Partition Master ISO or utilize BootIce).
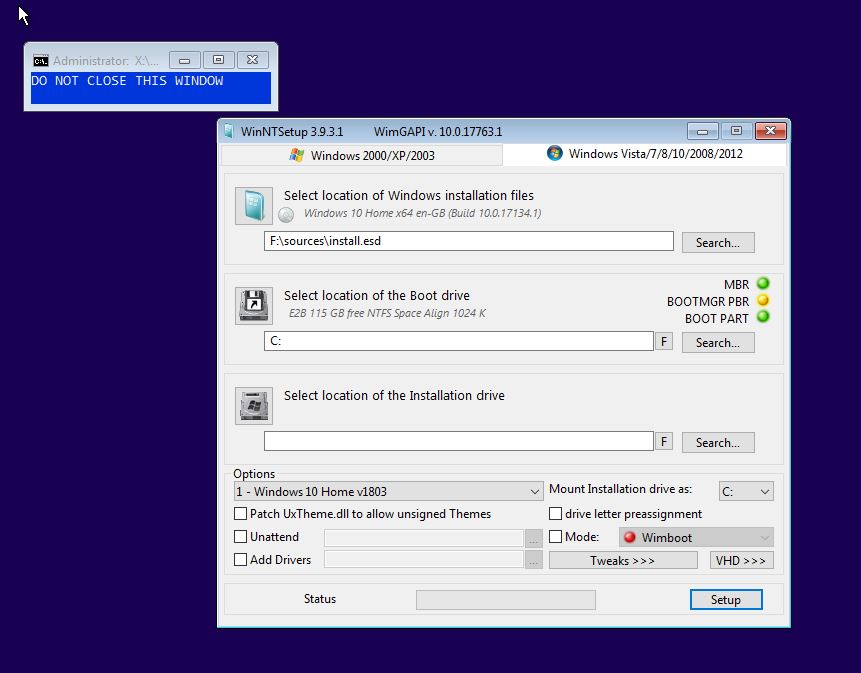
4. Now run WinNTSetup (either the 32-bitWinNTSetup_x86.exe or 64-bitWinNTSetup_x64.exe version) andselect your ISO file(you must apply v.iii.nine.one or after).
Tip: To install from anXP ISO file right-click on the 'Search' button or CD+box icon to load the ISO every bit a virtual bulldoze. If WinNTSetup cannot find the install.wim\install.esd file, yous may need to use the Search button to discover the Virtual CD mounted by WinNTSetup (made afterwards selecting the ISO file) and and then select the Install.esd\Install.wim file manually from the virtual CD drive (e.chiliad. G:\sources\install.esd).
Ensure that WinNTSetup finds the install.wim\esd\swm file (run across first arrow in screenshot below).

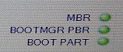
Check that the three 'trafiic lights' are all greenish. If not, the partitions are not correctly formatted. Press F1 in WinNTSetup for aid.
five. Select the Kicking (Organization) volume – in my instance S:
6. Select the 'Installation' (OS) volume – in my case W:
7. (optional) Select an XML file – tick the ' Unattend ' push.
Tip: right-click the on the check-box to edit the XML file.
In my instance I selected 1 of the ZZDanger_xxxxxx_SDI_CHOCO.XML files. Note that if the XML file contains a drive sectionalisation section, it will be ignored, so the partitions will remainunchanged.
Note:theversion of Windows that is installed is determined by the one that you select in WinNTSetup and NOT the XML file.
In that location are other options available in WinNTSetup, such as creating VHD files so that you can install to a VHD, and calculation 'Tweaks' and your own drivers.
eight.Select the Windows Edition in WinNTSetup, e.g. Professional (N.B. The settings in the XML file will exist ignored, and then you lot must select the correct Edition).
9. Click theSetuppush – you tin can change a few options here if you wish (not unremarkably required) – to support both UEFI and MBR booting, make certain theALLoption is displayed. You can tick the Restart option if yous wish and it will automatically reboot afterwards.
x. Click theOKbutton and WinNTSetup volition copy the files beyond to your target volumes and make it bootable.
In one case the copy phase has completed, reboot and brand sure yous configure the target system'due south firmware to boot in either MBR or UEFI style, equally desired.
If running an SDI_CHOCO.XML unattend file, I advise you remove the E2B USB drive once SDI_CHOCO tells you to. Otherwise yous may discover that the target organisation volition effort to reboot from the E2B bulldoze.
If you are non using SDI_CHOCO, then you tin can disconnect the E2B USB bulldoze before you lot allow the target system to boot.
Directly Kick and auto-run WinNTSetup (E2B v1.A9+)
If you proper name the end of the ISO filename equally_.WinNTSetup.iso (non case sensitive) and then E2B will kick from the ISO, and then run WinNTSetup from the E2B bulldoze and so automatically load the ISO every bit the source file. If you lot place the ISO in ane of the \_ISO\WINDOWS\xxxxxx folders, when you are prompted to 'Press enter only if you lot want to repair' and you printing ENTER, and so information technology will run WinNTSetup instead of the normal Setup.exe procedure.

Tip: Employ Ctrl+Southward to save a configuration file after you take set up all the options. And so employ Ctrl+L to load the same configuration file for the adjacent time!
Tip: Employ Ctrl+Shift+D to run a diskpart script to quickly division and format a drive.
Utilize the grub4dos STARTUP variable to run whatsoever WinNTSetup command line
By default, the E2B WinNTSetup process cause the \_ISO\e2b\grub\start_WinNTSetup.bat file to run once it boots to WinPE. If yous want to run a specific WinNTSetup control line and so you can use the STARTUP variable in a .mnu file to specify a different batch file which you tin can modify however yous wish. In this style, for example, you tin run WinNTSetup and specify in the batch file an XML file, Edition (Pro, Dwelling house, etc.) and any other parameters yous want. See \_ISO\docs\Sample mnu Files\Windows\WinNTSetup.mnu for an example file and copy it to an E2B menu binder.
#Copy the \_ISO\e2b\grub\start_WinNTSetup.bat to your \_ISO\docs\E2B Utilities\WinNTSetup binder on the E2B drive (or \WinNTSetup folder)
title WinNTSetup examination\nBoot to Windows ten and run WinNTSetup
# Note use forward slash instead of \  and escape (precede) spaces using \
set STARTUP=/_ISO/docs/E2B\ Utilities/WinNTSetup/test_WinNT.bat
#we need to utilise the force.WinNTSetup keyword if the name of the ISO does not end in _.WinNTSetup.iso...
QRUN.g4b forcefulness.WinNTSetup /_ISO/MAINMENU/Windows10_2018_08_03_UK_Both.iso
boot
due east.k.test_WinNT.bat can be edited to run an XML and specify the ISO and Edition you lot want to install using, for example:
"%wpath%\WinNTSetup%pp%.exe" NT6 -source:"%MYISO%" -wimindex:"2″ -unattend:"Win10UK_with_SDI_CHOCO.xml"
or this line which also specifies configuration file and the kick and system volumes:
"%wpath%\WinNTSetup%pp%.exe" NT6 -source:"%MYISO%" -wimindex:"5″ -cfg:"WinNTSpecial.ini" -sysPart:D: -tempDrive:D:
Note that y'all (or your script) must clean, partition and format the target drive. Also yous (or the command line parameters) must specify which Edition (wim index number) yous want to install – it isnotcontrolled by the XML file. Precede the command line with set MYISO=%E2BDRIVE%\_ISO\WINDOWS\WIN7\Win7x64.iso if you desire to specify a unlike ISO. When in WinNTSetup.exe, you can set any tweaks, settings, etc. and the press Ctrl+S to save them into an .ini file. You tin and so specify that .ini file as a parameter for WinNTSetup to load. See blog post here.
Install Windows 7 onto a system with USB iii ports (E2B v1.B0+)
The Sample menu file at "\_ISO\docs\Sample mnu files\Windows\Install Windows 7 with USB 3 (WinNTSetup).mnu" can exist used to kicking from a Win10 Install ISO and install Windows vii.
Copy the file to an E2B menu folder and modify information technology as required.
#Utilise this menu to boot from a Win10 or Win8 Install ISO (or WinPE ISO) and load a unlike ISO - e.1000. Win7 ISO
#See https://www.easy2boot.com/add-payload-files/windows-install-isos/winntsetup/
title Install Windows 7 (WinNTSetup+Windows x)\nBoot to Windows 10 and run WinNTSetup\nwith Windows 7 ISO as the source.\nUseful if the organisation has USB 3 ports
# Paths: use forward slash instead of \  and escape (precede) spaces using \
# Specify kick ISOset ISO=/_ISO/WINDOWS/WIN10/Windows10x64UK_Oct_2018.iso
# Specify alternate Source ISO to load into WinNTSetup
set ALT_ISO=/_ISO/WINDOWS/WIN7/Win7PRO_x86_X15-65804_NCQ.iso
# Specify alternate batch file to run
#set STARTUP=/_ISO/docs/E2B\ Utilities/WinNTSetup/test_WinNT.bat
#we need to use the force.WinNTSetup keyword if the proper noun of the ISO does not end in _.WinNTSetup.iso...
QRUN.g4b forcefulness.WinNTSetup %ISO%
kicking
UEFI-simply systems
You can MBR-kick and install a UEFI+GPT version of Windows to a target hd, even so some systems cannot MBR-boot, they can merely UEFI-boot.
If you lot employ Easy2Boot v2 with agFM UEFI files, you tin directly UEFI-boot from a Windows ISO.
Another alternative is to create a .imgPTN file…
You will need to create a FAT32 WinPE .imgPTN file using the MPI Tool Pack v0.070 or later. This version includes\e2b\RestoreE2B_32_64.cmd which will piece of work under 64-fleck WinPE besides every bit 32-chip WinPE without needing WoW64. You can use any UEFI-bootable source for the WinPE – e.g. Windows 10 Install ISO (the \sources\install.wim file tin can be removed). If the \sources\install.wim or install.esd file is greater than 4GB, instead of running MakePartImage, run Split_WinISO.exe (in the MPI folder) to separate the file.
- When you accept created the .imgPTN file, switch to it using \_ISO\SWITCH_E2B.exe (a 32-bit executable).
- Now UEFI-boot from the E2B USB bulldoze on the target UEFI organisation.
- Once it has booted to WinPE, run\e2b\RestoreE2B_32_64.cmd and answer Y when prompted to switch in the E2B partitions (annotation: does not work in XP WinPE then try other .cmd scripts if XP PE).
- You tin can now access the \WinNTSetup folder, the Windows Install .ISO files and the .XML files that are on the E2B partition.
- Run WinNTSetup and proceed equally outlined to a higher place.
Tip: if you prefer, you can place the \WinNTSetup folder and all the ISOs on the 2nd partition of the E2B drive and apply a .imgPTN23 file extension so that the 2nd segmentation can be accessed.
Install XP to a SATA\RAID HDD from a USB 2.0 or three.0 port
It is catchy, merely y'all can install XP to a SATA\RAID hard disk and kick from a USB 3.0 port.
This allows you to install XP to a system that has a SATA hd, even if information technology has simply USB 3.0 ports.
You volition demand an XP ISO (due east.g. XPSP3) and a Windows 8, 8.1, x Installation ISO (or any Win8/10 WinPE ISO)
- Copy the WinNTSetup_DPMS_Step2.mnu from the \_ISO\docs\Sample mnu Files\Windows binder to \_ISO\MAINMENU or \_ISO\WINPE, so edit the XPISO entry to match your ISO in the \_ISO\WINDOWS\XP folder.
- Copy WinNTSetup files to the E2B drive (e.chiliad. \_ISO\docs\E2B Utilities\WinNTSetup\ – meet above).
- Boot using E2B to a Windows 8.1 or Windows ten Installation ISO to run WinPE (or utilise any WinPE ISO)
- At first screen, press SHIFT+F10 and run WinNTSetup.exe (either x86 or x64 version) from the E2B USB drive – then select theWindows 2000\XP\2003tab.
- Format the target HDD (e.1000. using diskpart) and select correct XP ISO file from the \_ISO\WINDOWS\XP binder (correct-click on the 'Select location' icon to mount the ISO) – select target volumes (e.g. W: and W: if one division) and click Showtime.
- Reboot back to E2B drive and run the 'Employ afterward WinNTSetup to add SATA\RAID drivers' card entry. It volition pick the correct DPMS SATA commuter for XP. In my tests, I had to press ESC 9 times to skip by the firadisk driver files not loading (non sure why this happens!).
- Allow to reboot from HDD to finish installation (or press F7 if it boots back to E2B).
Note: You can utilize CTRL+SHIFT+D to run a diskpart script in WinNTSetup, however make certain that the script file creates partitions suitable for XP.
Here is a uncomplicated diskpart script for a single, maximum-sized NTFS sectionalization.
Disk0_bios_singlemaxptn.txt
select disk 0
make clean
convert MBR
create partition primary
format quick fs=ntfs label="Windows"
assign letter="Westward"
active
list volume
exit
Scripting WinNTSetup
It is possible to script WinNTSetup.exe. Y'all could create a .cmd file which runs a diskpart script and and then runs WinNTSetup.exe, e.k. where U: is the E2B drive which contains the install.wim and some drivers (untested)…
REM sectionalisation deejay using a diskpart script diskpart /s U:\Win7\Win7.scr REM Install Windows7 Ultimate (usually Wimindex 5) to drive C:, using unattend.xml file and define driver to integrate. REM Use C: as driveletter for the new Win installation, run set_7_usb_boot.cmd earlier rebooting U:\WinNTSetup\WinNTSetup_x86.exe NT6 -source:U:\sources\install.wim -WimIndex:5 -syspart:C: -tempdrive:C: -unattend:"unattend\Win7x86_Ultimate_en.xml"-ForceUnsigned -drivers:"U:\driver_Win7x86" -Sysletter:C -RunAfter:"set_7_usb_boot.cmd C:\windows" -setup -reboot
Tip: If you use Split_WInISO.exe to create a .imgPTN file from a Win10 install ISO, it will add together the winpeshl.ini files into the kicking.wim for you. When you kicking to WinPE using the .imgPTN file (MBR or UEFI), it will automatically run \motorcar.cmd. So you can edit \auto.cmd to create a menu and use information technology to select any 1 of a range of .cmd script files.
Source: https://easy2boot.xyz/create-your-website-with-blocks/add-payload-files/windows-install-isos/installing-windows-xp7810-using-winntsetup/
Posted by: allenphre1942.blogspot.com
0 Response to "How To Install Windows Xp On Windows 7 Ultimate"
Post a Comment